

Something that is incredibly functional and essential to most weddings is signage! It’s the key to simple communication for your guests to know where to go or what to expect. But sometimes the functionality of signage is just, well… boring. People are wanting to take what can be mundane and functional to something that makes a simple or big statement! Adding flowers or greenery to your signage can be a really simple and affordable way to make your wedding feel special and more cohesive.
Here’s what you’ll need:
-
Sign of your choice
-
An Easel or some way to stand your sign up
Suggested Supplies:
In this tutorial, we’ve given a couple of ways to place the floral foam on your signage, so pick the option that works best for you.
-
Option 1: Plastic pew marker with floral foam
-
Option 2: 3M command hooks (choose a size that can hold 2-5lbs or more if it’s a larger arrangement)
-
Floral wire or chicken wire
-
1 brick floral foam (cut down to size)
-
Mini zip ties
FLORALS NEEDED FOR YOUR SIGNAGE ARRANGEMENTS
THE FOLLOWING ITEMS ARE EXACTLY WHAT WE USED IN THIS TUTORIAL.

FLOWERS:
-
1 Dephinium
-
3 Blush Carnations
-
3 Terra Cotta Carnations
-
2 White Mini Carnations
-
2 White Roses
-
3-5 Sprays of Wax Flower
GREENERY:
-
Stems of Gunni Eucalyptus
-
Stems of Silver Dollar Eucalyptus
-
Stems Leather Leaf
-
Stems Lemon Leaf (salal)
HOW TO ASSEMBLE DIY FLORAL WEDDING SIGNAGE ARRANGEMENT Start with Focal Flowers
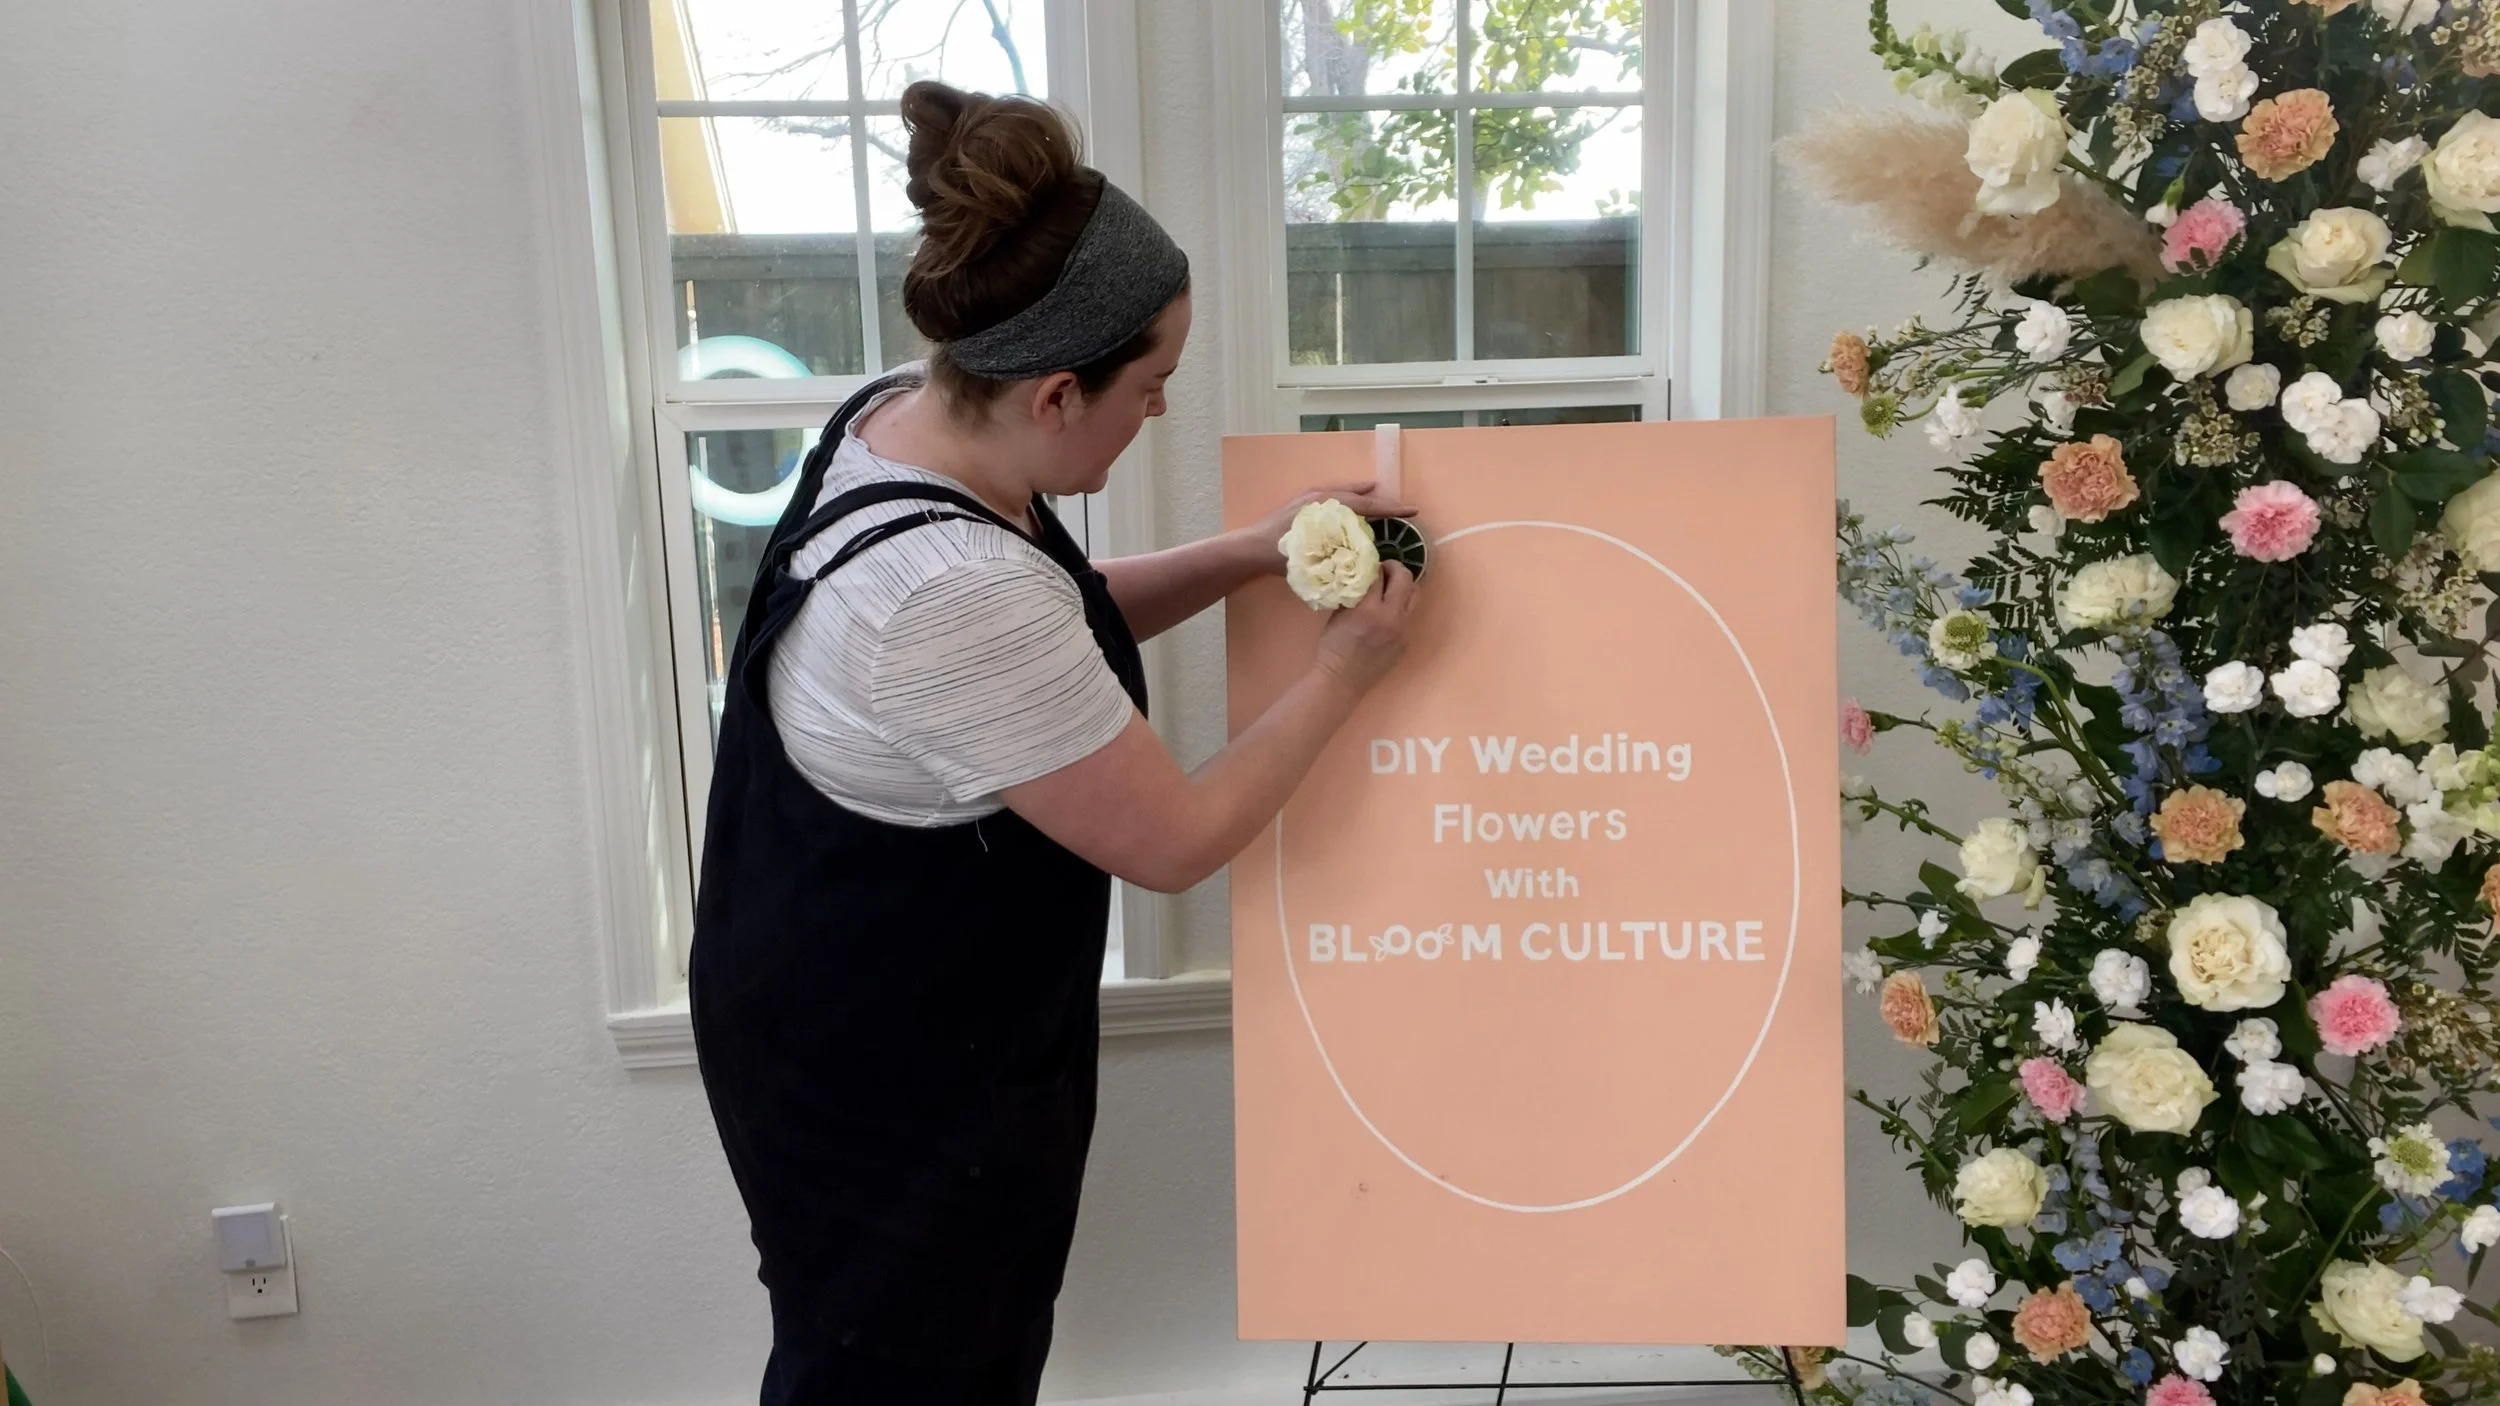 Start with Focal Flowers
If you are familiar with any of our other tutorials we are going to break with “tradition” in this design. We usually, almost always, start with greenery. But due to the scale of this design, we are actually going to start with our focal flowers.
I started this design with our focal flowers of white roses because it is such a small-scale design and placing the focal flowers first helps set the foundation of the arrangement. Due to them being so big, they can take up a lot of space! I usually do 2-3 roses first then add in the greenery.
With this design, we won’t be using much which is super helpful to keep the budget down– but it also makes a statement. Win-win situation if you ask us!
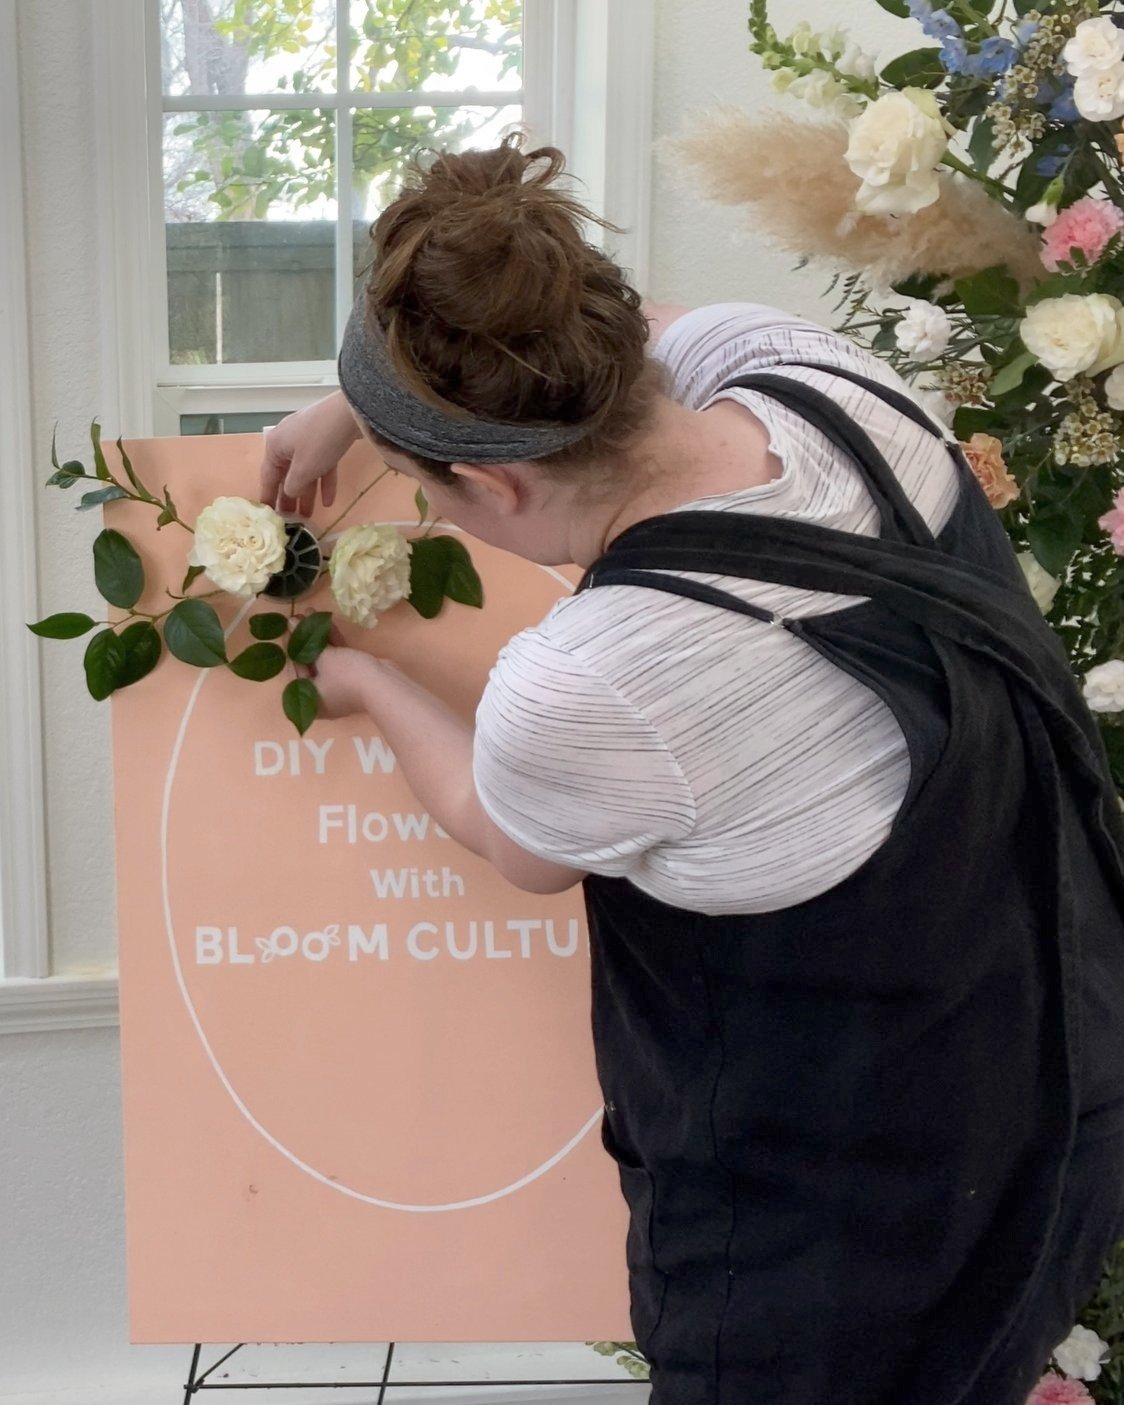
Add Greenery
Okay, so after we place the roses we place a few key pieces of greenery, we ant to create some shape as well as help create dimension with these pieces. I also use them to cover up our mechanics, or the tools we use to hold the flowers. You don’t want any plastic or foam showing.
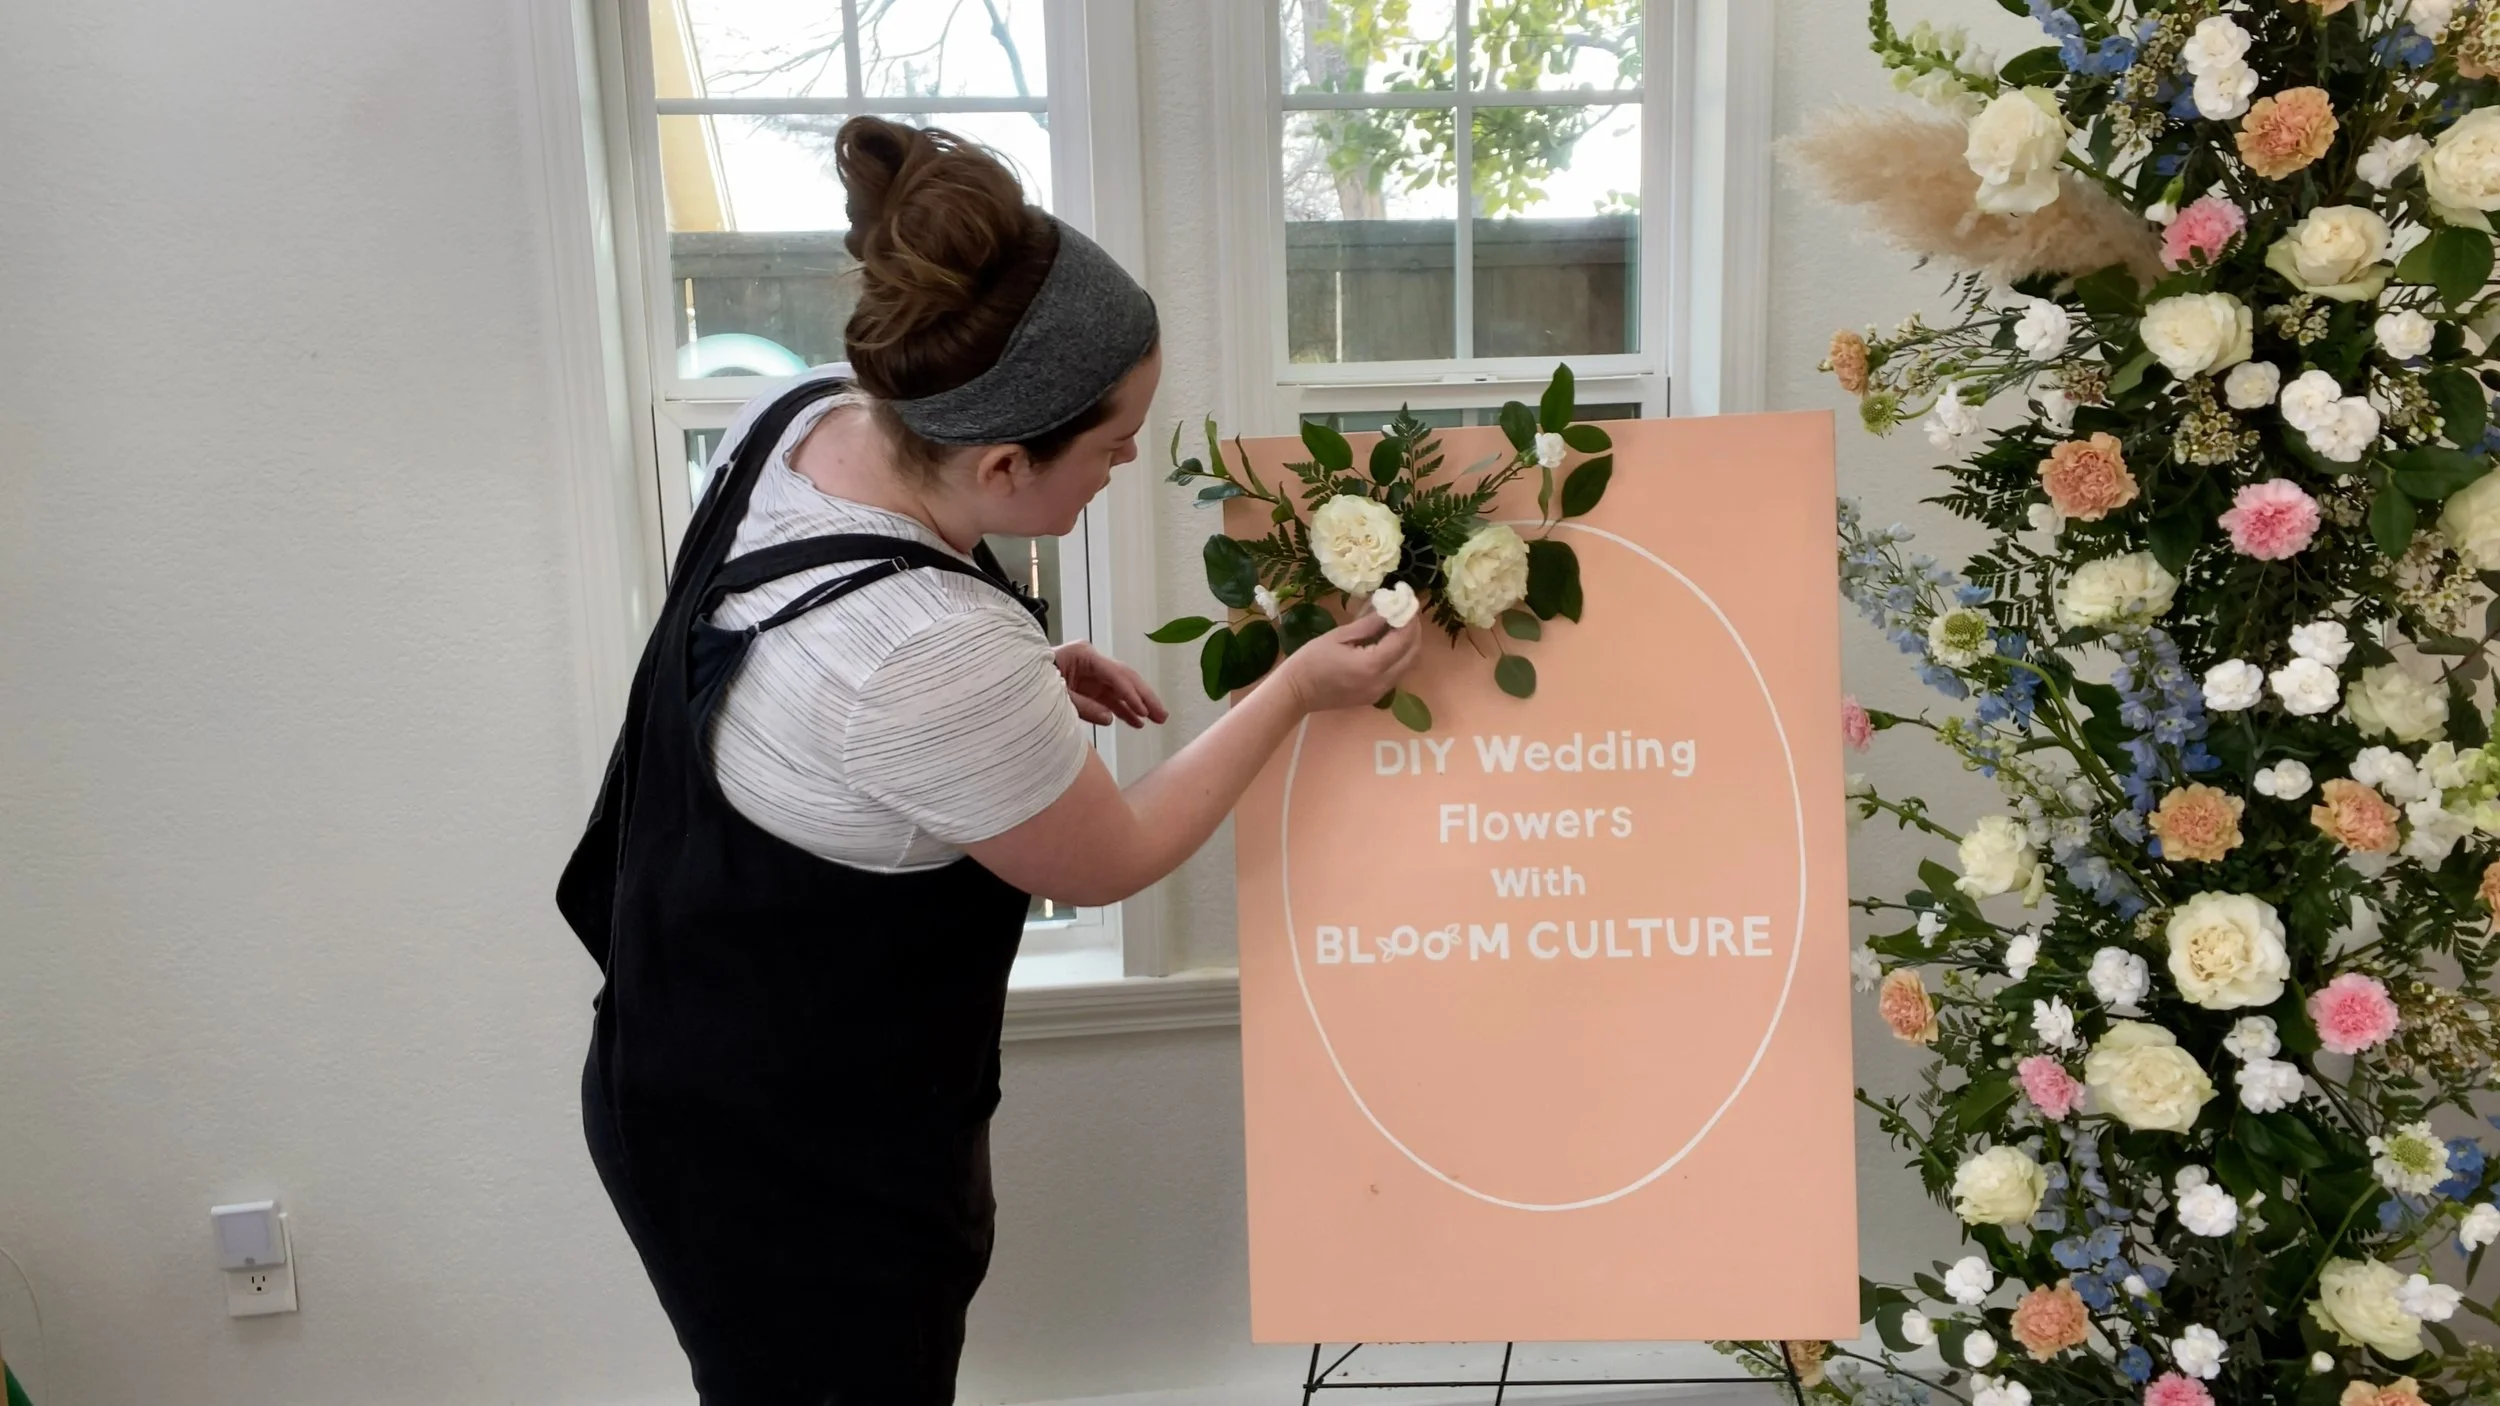
Move on to Spray Flowers
Once I’ve placed some greenery, I’ll work in the spray flowers, here we’ve used white mini carnations and they are absolutely perfect to add a different scale, texture, and color. I’ll use a few longer stems and a few shorter stems of blooms (always use varying lengths) to help solidify the shape of the design and create depth.
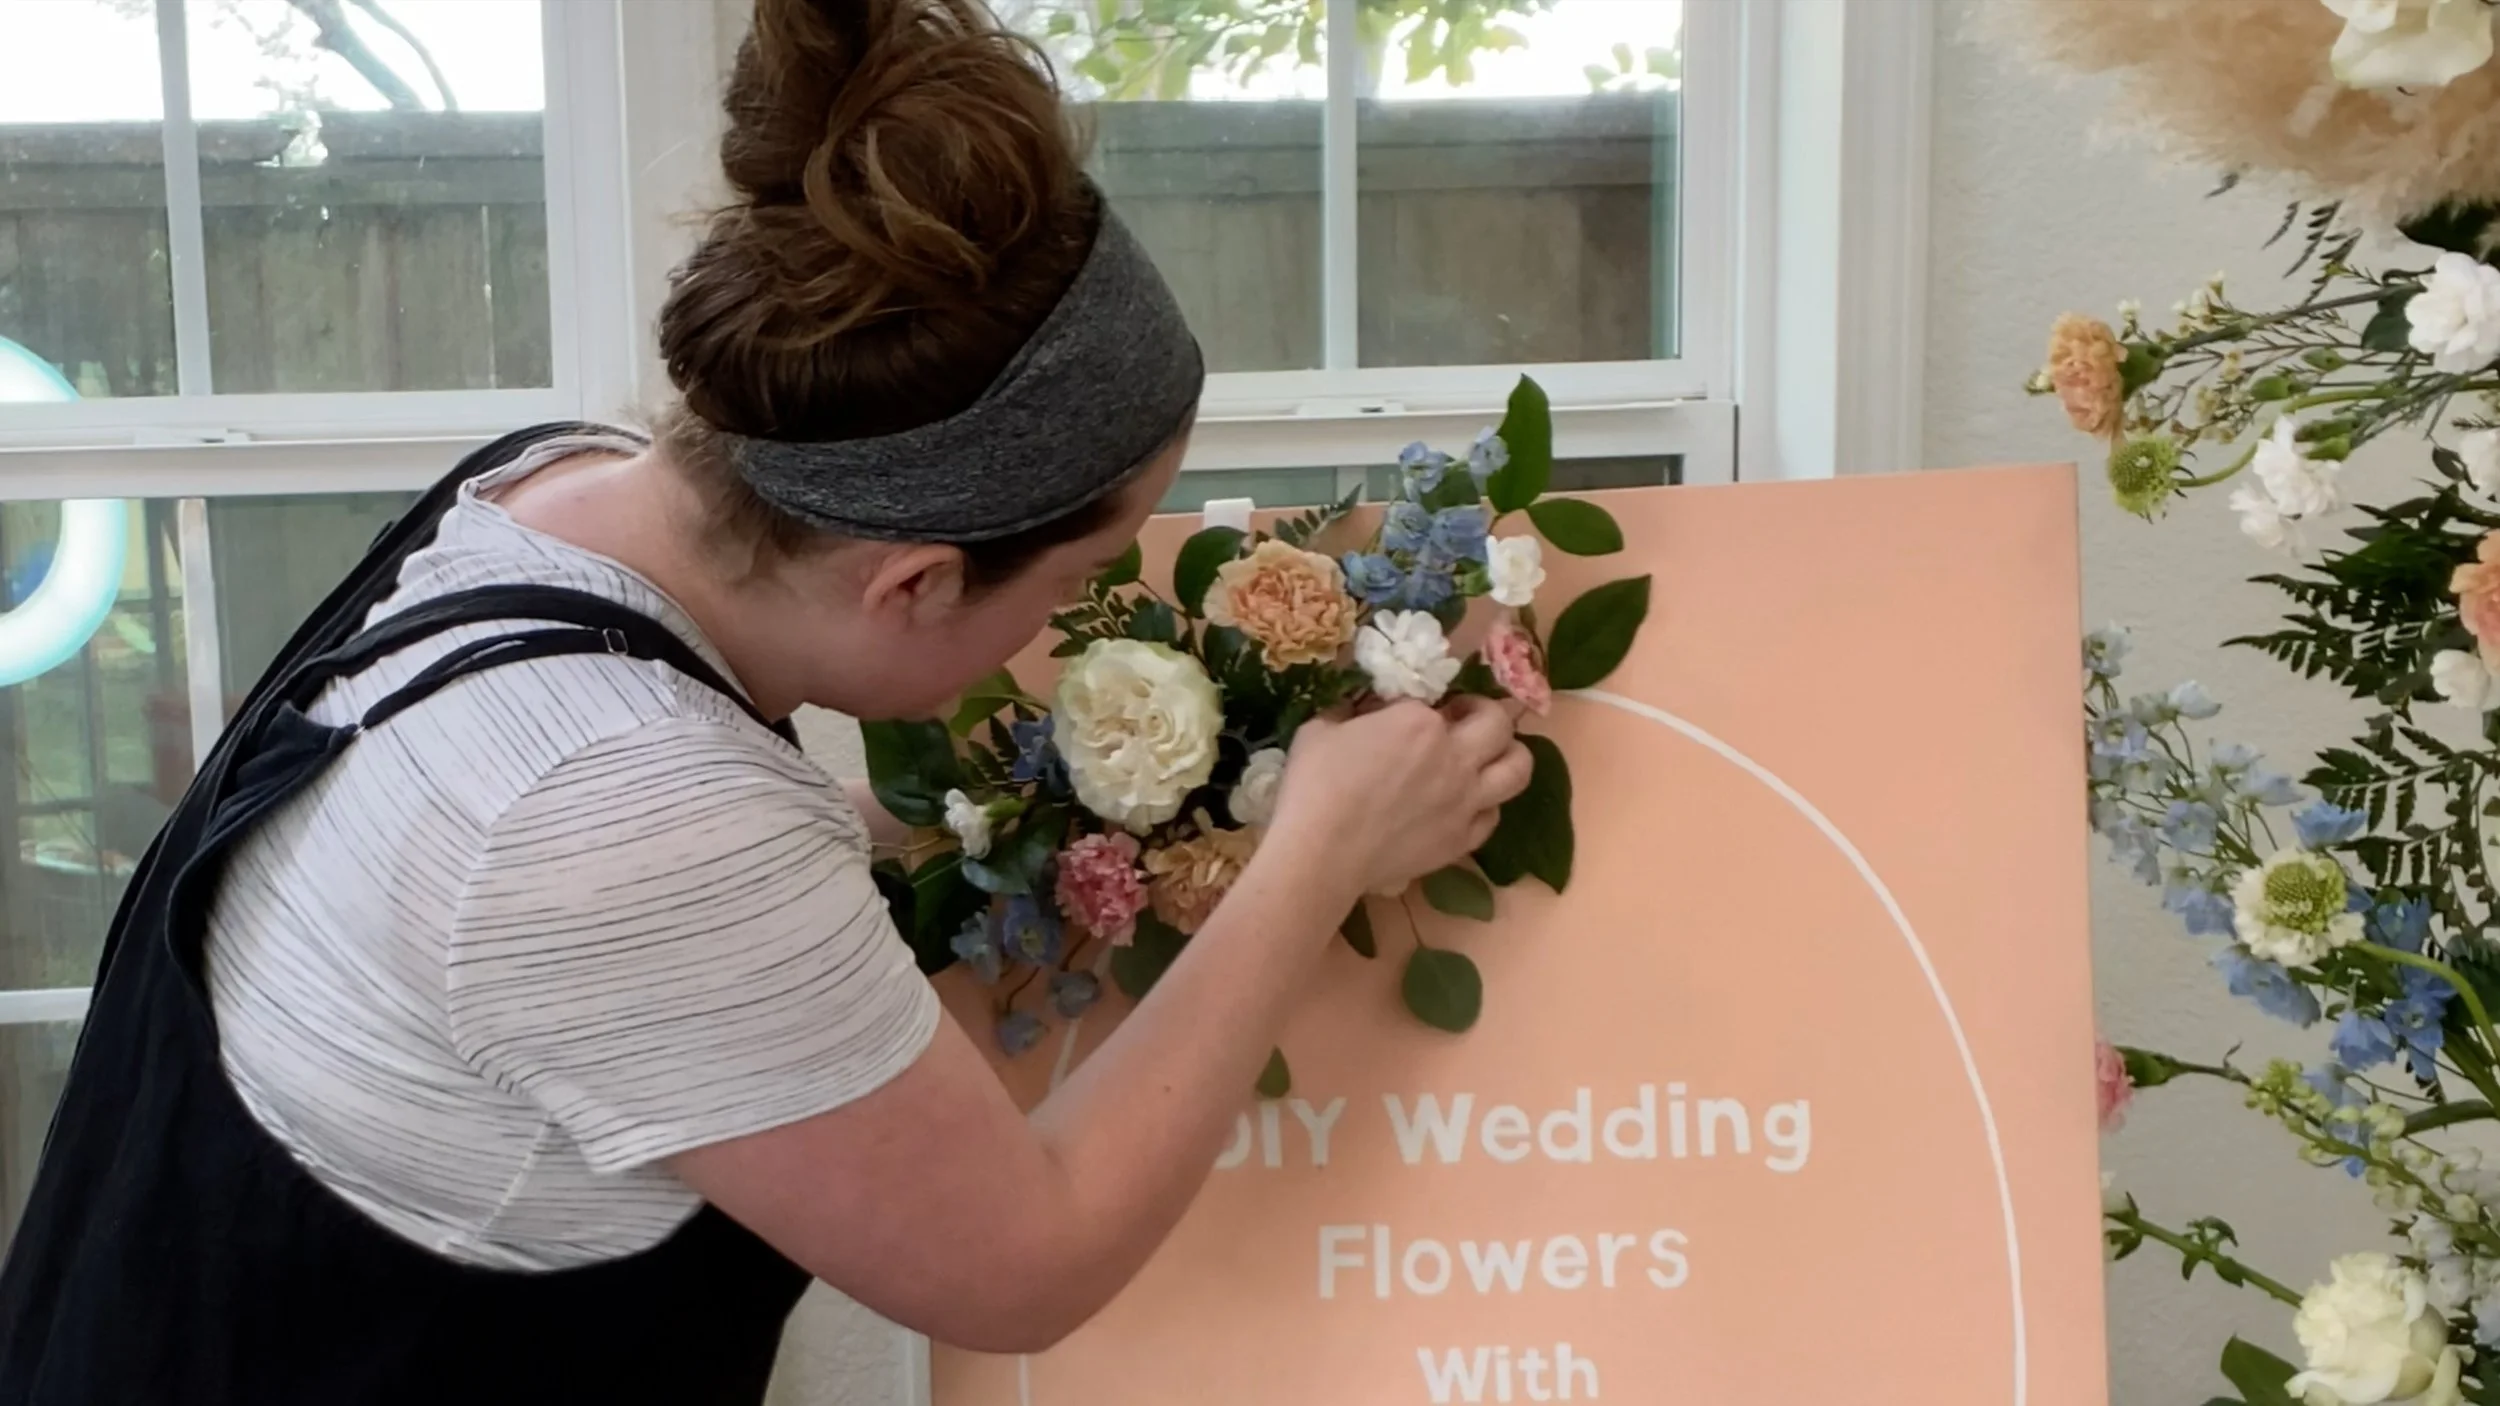
Next, I’ll move on to our carnations to add in the color. Again, these are a bit larger in this design so I use only a few (2-3) at varying stem lengths. If you cut them all the same length it will just be a ball of flowers. If we use varying lengths, it will look more professional and organic.
After placing the carnations. I work in some of the blue delphinium. This line flower is very long and very rigid. You must break down the stem aka cut it down to smaller pieces or individual blooms before you are able to work it into the design. If you placed just one large stem in the design it would most certainly stick out like a sore blue thumb. Working in the smaller pieces or even individual blooms adds in that lovely blue color and helps complete the design.
Finish with Fillers
To finish it off I work in small stems of wax flower to fill in any holes there may be, covering up any visible floral foam or plastic. After this step I come back in with any leftover greenery that I think would help either cover-up mechanics or in this instance, I wanted to create a little bit of an organic feel by adding in longer pieces on the end to create more of a focus with the design.
Pro-tip: Take a step back periodically and get a better look at the design. Getting a zoomed-out vantage will help a TON in placing greenery and floral and make the design flow better.
With this design, simple is better as the floral design is meant to accent the signage, not cover it. Make sure you cover anything that isn’t waterproof with a towel as the wet floral foam drips a bit when you place the stem in it.
Keep it simple and you can’t go wrong!
WATCH THE DIY SIGNAGE FLORAL VIDEO TUTORIAL
If you are a more visual learner or need more clarification, please check out our full-length tutorial where I walk you through this design process step by step!
Leave a comment